自定义API接口在Knife4j的Ui界面中显示
本文主要介绍在 Spring Boot 应用中,如何使用 springfox 和 springdoc 框架自定义添加外部 API 接口,并在 Knife4j 的 UI 界面中展示。
关联Issues:
🏖️ 本文仓库:knife4j-customer-api
📹 视频地址:https://www.bilibili.com/video/BV19h4y1j7y9/?vd_source=ef34098d916a578698508a43063099ac
🌱 本质
我们要实现将自定义的API接口添加到Ui界面中显示,其实最简单的就是在我们接口渲染的Swagger或者OpenAPI对象中,添加相应的新对象(PS:用于在OpenAPI规范中描述接口定义的Operation对象)属性就好了
这需要借助于底层解析框架对外是否提供了开放接口,允许我们这么做,还好目前不管是springfox或者springdoc,其实都支持开发者自定义。
主要的区别是:
- ✅ springfox提供的是spring-plugin体系,在解析时添加
Operation对象,这是进行中的处理行为 - ✅ springdoc提供的全局Customer接口,springdoc已经完成了所有接口的对象解析,但开发者实现Customer接口可以自定义更改,这是后置行为
📜 springfox
在springfox的框架中,提供了基于spring-plugin体系的解析接口,开发者如果阅读过springfox的源码后,应该很轻松就能实现
主要的动作包括:
- 🎠 自定义plugin接口,实现
ApiListingScannerPlugin.java类,并且通过@Component或者Java Config得@Bean注解注入到Spring的容器中 - 🎢 创建
Operation对象,该对象是一个接口的描述,包括:说明、参数、响应、请求类型等等,并且返回ApiListingScannerPlugin.java接口约束的方法类型 - 🏎️ springfox这种方式只能提供简单的form表单类型的接口,如果是类似
@RequestBody类型的JSON、XML请求,那么建议放弃~
示例:添加一个简单的login登录接口,代码如下:
com.xiaominfo.springfox.customer.CustomerApiPlugin.java
@Slf4j
@Component
public class CustomerApiPlugin implements ApiListingScannerPlugin {

    @Override
    public List<ApiDescription> apply(DocumentationContext context) {
        // consumers、produces
        Set<String> mediaSet = new HashSet<>();
        mediaSet.add(MediaType.APPLICATION_JSON_VALUE);
        // 设定参数
        List<Parameter> parameters = new ArrayList<>();
        parameters.add(new ParameterBuilder().name("username").required(true).modelRef(new ModelRef("String")).defaultValue("test").description("用户名").build());
        parameters.add(new ParameterBuilder().name("password").required(true).modelRef(new ModelRef("String")).defaultValue("123").description("密码").build());
        // 接口的Tag
        Set<String> tags = new HashSet<>();
        tags.add("首页");
        // 构建Operation对象
        Operation usernamePasswordOperation = new OperationBuilder(new CachingOperationNameGenerator())
                .method(HttpMethod.POST)
                .tags(tags)
                .summary("用户名密码登录")
                .notes("用户登陆获取token")
                .parameters(parameters)
                .consumes(mediaSet)
                .produces(mediaSet)
                .build();

        // 需要注意的是groupName需要和开发者创建的Docket对象赋值的groupName保持一致
        ApiDescription loginApiDescription = new ApiDescription("hello", "/login", "登录接口描述", Collections.singletonList(usernamePasswordOperation), false);
        return Collections.singletonList(loginApiDescription);
    }

    @Override
    public boolean supports(DocumentationType documentationType) {
        return documentationType == DocumentationType.SWAGGER_2;
    }
}
📚 springdoc
在springdoc中,其实和springdoc的思想是完全一致的,springdoc也开放了两种级别的customizer接口:
- 🏜️
GlobalOperationCustomizer:针对Operation级别的全局自定义扩展钩子函数,开发者可以对接口中每一个Operation进行扩展自定义实现,或调整,或修改,或增加扩展都行,Knife4j的部分增强特性就是基于此函数实现,可以参考代码Knife4jJakartaOperationCustomizer.java - 🏝️
GlobalOpenApiCustomizer:是针对整个OpenAPI级别的,开发者在分组或者分包后,得到的单个OpenAPI实例,开发者可以操纵全局的OpenAPI实例,该OpenAPI对象已经是springdoc解析过的实例对象,例如该issues中的需求,开发者只需要自定义创建新Operation对象,然后通过OpenAPI实例对象进行add添加即可完成此需求,部分扩展可以参考代码:Knife4jOpenApiCustomizer.java - 🎠 扩展实现类接口后,注入Spring的容器中即可
考虑到我们是新增自定义的API接口,因此,可以实现GlobalOpenApiCustomizer类进行扩展
代码示例如下:
com.xiaominfo.springdoc.customer.CustomerOperation.java
@Slf4j
@Component
public class CustomerOperation implements GlobalOpenApiCustomizer {

    @Override
    public void customise(OpenAPI openApi) {
        log.info("customer.");
        // 因为要新增自定义的接口,直接这里add
        PathItem pathItem = new PathItem();
        // 基础信息 构建Operation
        Operation operation = new Operation();
        operation.operationId("login");
        operation.summary("登录接口");
        operation.description("根据用户名和密码登录获取token");
        operation.tags(Collections.singletonList("登录"));
        // 构建参数
        List<Parameter> parameters = new ArrayList<>();
        parameters.add(new Parameter().name("name").example("zhangFei").description("用户名").required(true).schema(new StringSchema()).in("query"));
        parameters.add(new Parameter().name("password").example("123456").description("密码").required(true).schema(new StringSchema()).in("query"));
        operation.parameters(parameters);
        // 构建响应body
        ApiResponses apiResponses = new ApiResponses();
        ApiResponse apiResponse = new ApiResponse();
        apiResponse.description("ok").content(new Content().addMediaType("*/*", new MediaType().schema(new StringSchema())));
        apiResponses.addApiResponse("200",apiResponse);
        operation.responses(apiResponses);
        // 该自定义接口为post
        pathItem.post(operation);
        openApi.path("/login", pathItem);
    }
}
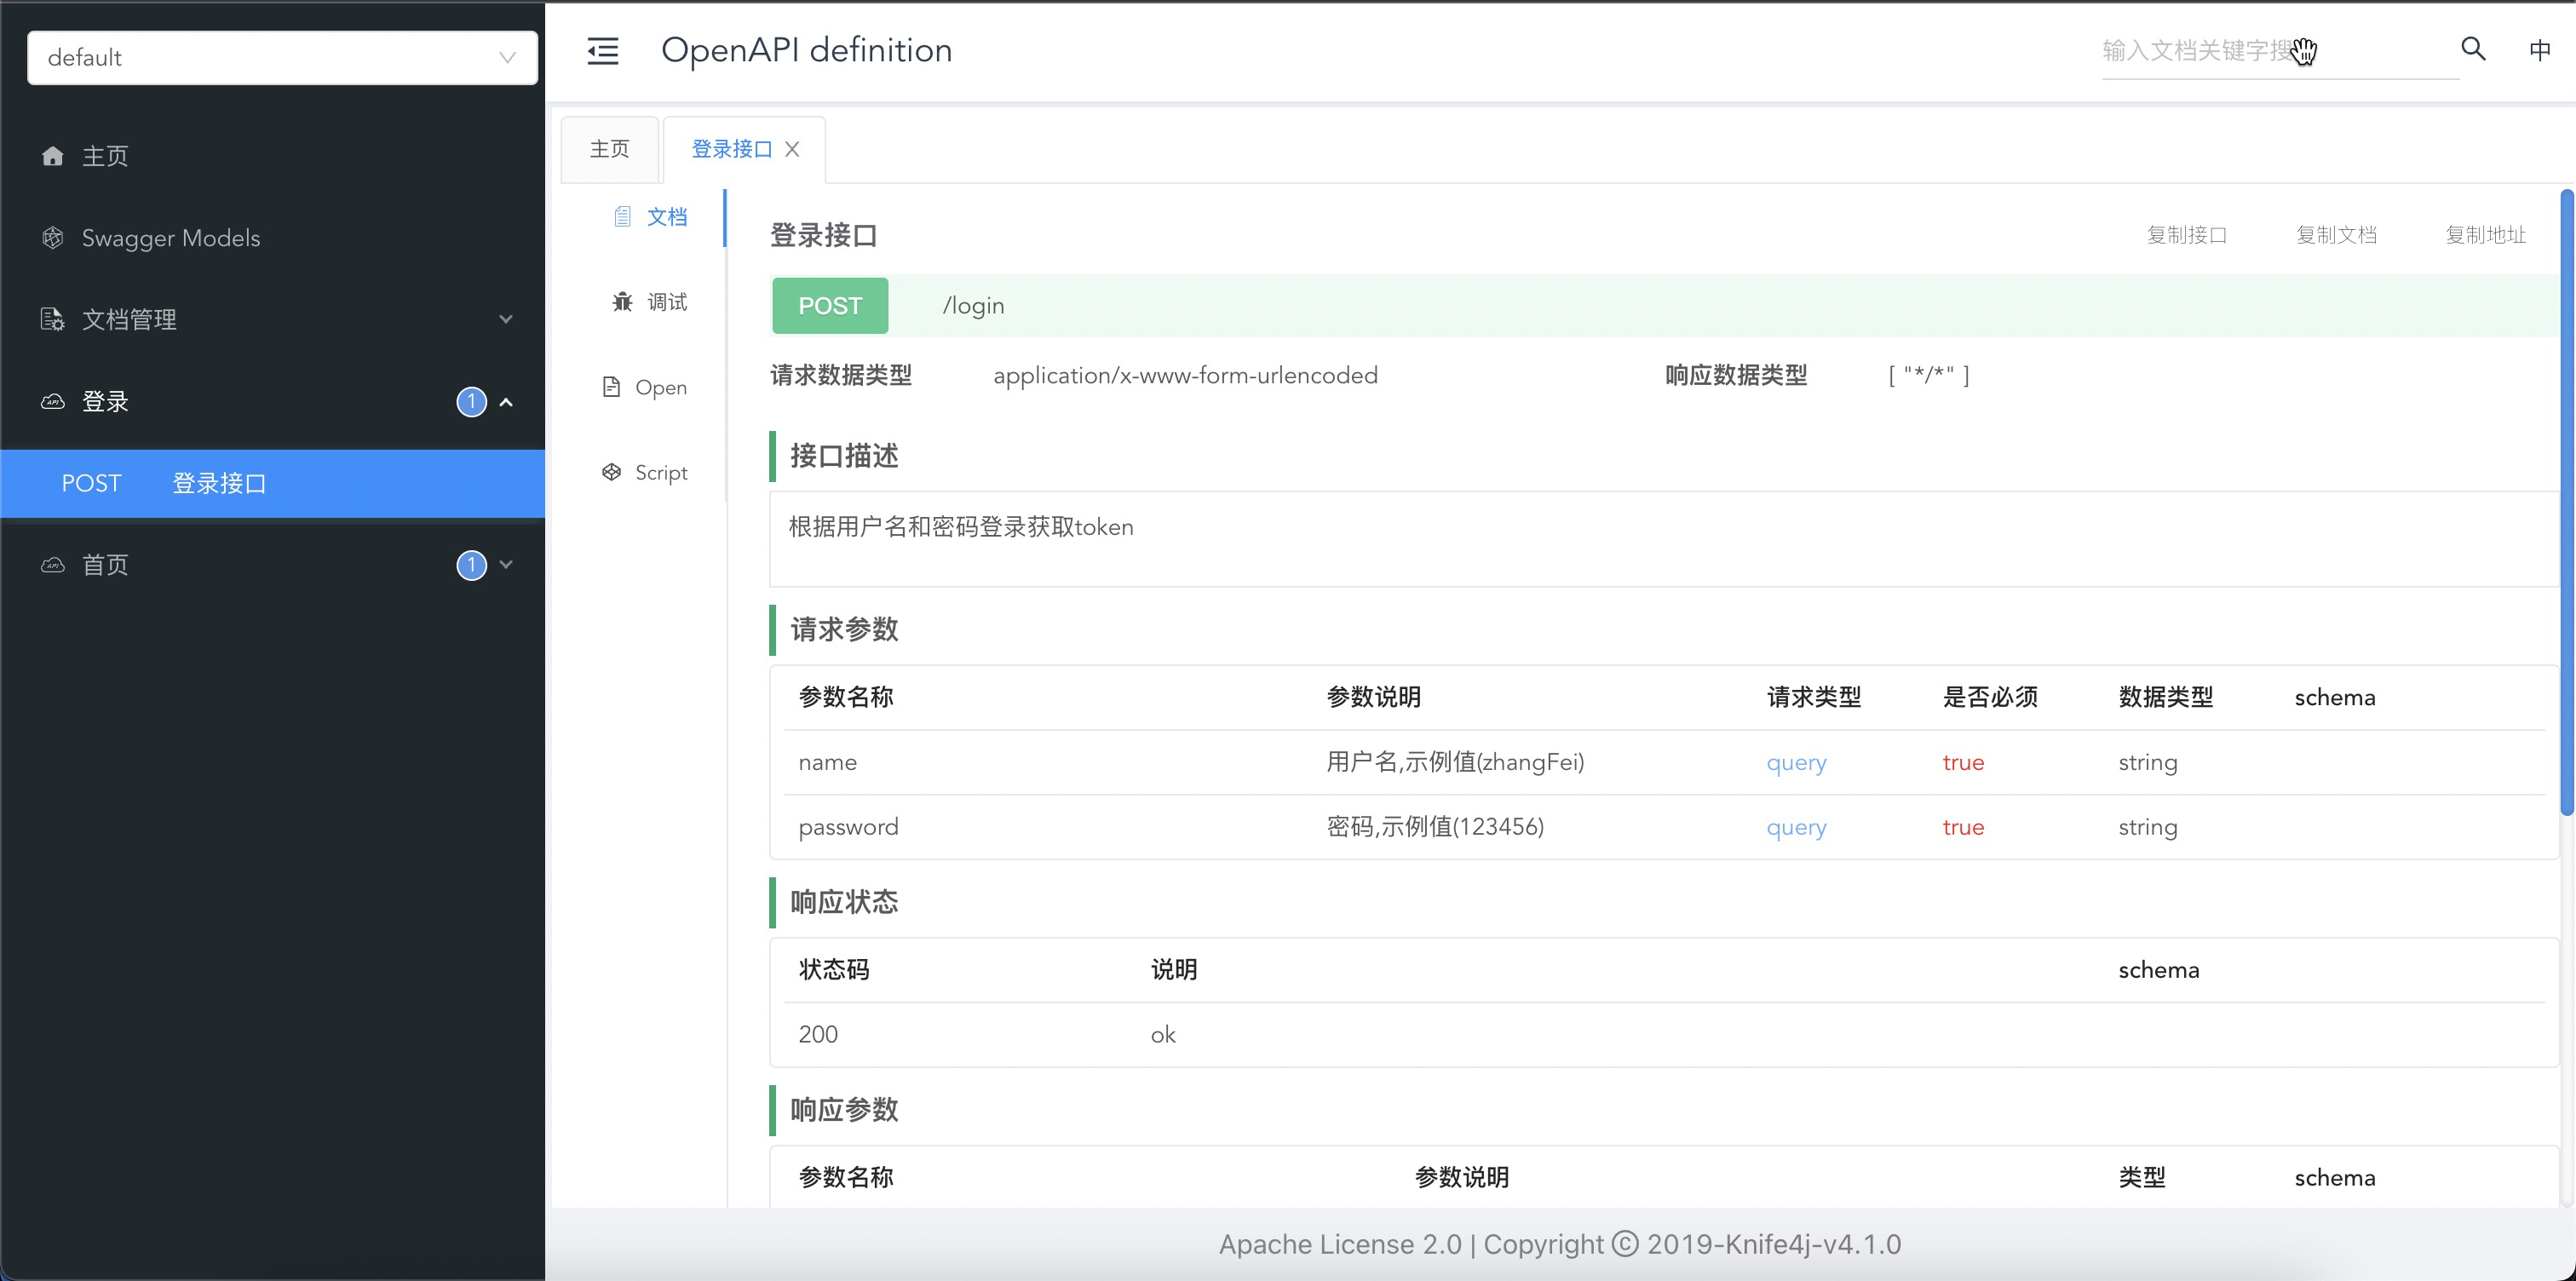
此时,我们可以在界面中查看,已经存在了我们自定义新增的接口,如下图:

📖 总结
本文主要介绍了基于springfox或者springdoc框架,添加自定义API接口的示例,开发者可以根据其中的思想自行扩展,达到自己的业务需求。