springfox 源码分析(七) 文档初始化
时间:2019-5-23 20:12:04
地点:家中
通过前面几篇文章对springfox的介绍,以及我们的学习准备工作,这篇我们将正式来探索springfox是如何初始化的
我们在学算法的时候,其中一个算法是快速排序,而快速排序讲究的是如果给定一个集合的元素<2,那其实就不用排序了,那就是最快的,取集合中任意元素M,然后,比M小的,排左边,比M大的排右边,这样只需要排2次(递归调用最小次数),这其中用到了分而治之的思想,这种思想我们在工作中也很适用,就拿学习源码来说吧,将一个看似很难的源码,分解成若干小块,每一个小块都逐一研究攻破,因为你不可能所有的都不懂,随着研究的过程中,自信心的增长,整个部分的源码最后你就会把他吃透.
项目结构
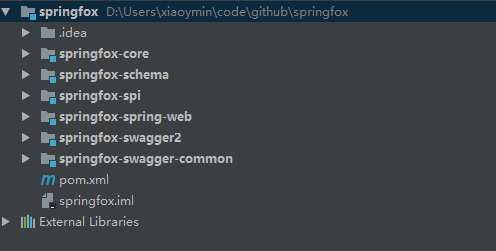
在这之前,我们先来看一下springfox的项目分层结构:

这是springfox 2.9.2版本的源码结构,主要包含了6个模块:
- springfox-core:springfox的核心包,里面基本封装的是一些实体类,core模块大量的运用了设计模式中的Builder构造器
- springfox-schema:一系列方法实现类
- springfox-spi:一系列的Plugin接口声明
- springfox-spring-web:针对spring-web模块的核心操作,springfox的初始化代码也在此模块中
- springfox-swagger2:对外使用类,注解,包括我们熟知的
@EnableSwagger2注解 - springfox-swagger-common:springfox的功能模块代码,Plugin接口的实现
启动类
启动类就是springfox的开始,从前面的篇幅我们也发现了,springfox没有给我们任何有益的提示,告诉我们他的启动类是那个,是具体在何时初始化的
当然我也是很茫然,一个偶然的机会,只是在代码中多瞟了一眼,我突然就发现了她,她就如太阳一样,温暖着我的心,令我为止动容,她就是springfox.documentation.spring.web.plugins.DocumentationPluginsBootstrapper.java
至于是如何发现她的,你们各自体会吧...
首先来看DocumentationPluginsBootstrapper.java的部分源码:
/**
 * After an application context refresh, builds and executes all DocumentationConfigurer instances found in the
 * application context.
 *
 * If no instances DocumentationConfigurer are found a default one is created and executed.
 */
@Component
public class DocumentationPluginsBootstrapper implements SmartLifecycle {
  private static final Logger log = LoggerFactory.getLogger(DocumentationPluginsBootstrapper.class);
  private static final String SPRINGFOX_DOCUMENTATION_AUTO_STARTUP = "springfox.documentation.auto-startup";
  //插件管理类,提供了一些列的Swagger相关参数的插件
  private final DocumentationPluginsManager documentationPluginsManager;
  //所有的请求接口结果
  /***
   * springfox.documentation.spring.web.plugins
   */
  private final List<RequestHandlerProvider> handlerProviders;
}
因为DocumentationPluginsBootstrapper类实现了Spring的SmartLifecycle接口,而我们都知道,在Spring的应用程序中,实现此接口后,并且通过@Component注入到容器的bean,在Spring容器初始化完成后,都会执行这个接口的start()方法.
既然是Spring容器初始化完成后执行的操作,我想那就是springfox的初始化操作,没错了(PS:因为我也再找不到其他的启动类了。。。)。
来看start方法
@Override
public void start() {
    if (initialized.compareAndSet(false, true)) {
        log.info("Context refreshed");
        //此处拿到DocumentationPlugin插件
        //因为Docket类是实现了DocumentationPlugin,我们在程序外部通过@Bean注解注入到Spring容器中,所以此处DocumentationPlugin的实例对象是Docket对象
        //一个Docket代表的一个分组,多个则是多个文档分组
        //调用guava的排序规则,根据groupName排序
        //思考:在重构Swagger-ui的过程中,会有需求能否提供默认的排序规则,因为groupName排序对用户来说太死板,可以提供一个order参数值来进行默认排序,这样对用户更友好
        List<DocumentationPlugin> plugins = pluginOrdering()
            .sortedCopy(documentationPluginsManager.documentationPlugins());
        log.info("Found {} custom documentation plugin(s)", plugins.size());
        //遍历Docket对象
        for (DocumentationPlugin each : plugins) {
            //获取文档类型,一般都是Swagger_2
            DocumentationType documentationType = each.getDocumentationType();
            if (each.isEnabled()) {
                //如果启用,则开始扫描生成文档
                scanDocumentation(buildContext(each));
            } else {
                log.info("Skipping initializing disabled plugin bean {} v{}",
                         documentationType.getName(), documentationType.getVersion());
            }
        }
    }
}
从代码中,我们看到:
- 首先获取
DocumentationPlugin的实现类列表,而DocumentaionPlugin我们在前面的章节也介绍过,他只有一个实现类,那就是Docket,而Docket类正是我们在使用Springfox的时候,通过编写SwaggerConfiguration配置文件,通过@Bean注解注入的对象,此处DocumentationPlugin的集合实际拿到的就是List<Docket>实例集合,我们在外部创建几个Docket,此处就会有几个DocumentationPlugin - 通过循环外部创建的Docket实体bean,最终转换为Documentation文档对象
我们找到了springfox的初始化方法,接下来,针对Springfox的各个操作步骤,我们逐一分析.